


Valentines made from anything and everything
With Valentine’s Day fast approaching, yesterday, I put on my crafty cap and got going.
In my usual fashion, I grabbed some odds and ends off the shelves in my studio and with absolutely no idea of where I was going, jumped in.
Instead of believing that you have to follow a step-by-step process in order to make a gift or card, take a look at what you have on hand and give free-form crafting a try. If you’re afraid of creating something on your own because you believe you “aren’t creative,” here are some suggestions:
- Fogettaboutit! Everyone is creative! Don’t let your 4th grade art teacher or your mom or Father Time convince you that you can’t come up with something.
- Look at crafting as an experiment. Allow yourself to make mistakes. I don’t like or keep everything I make, but so what? Nothing is lost and much can be gained from the experience. In other words, enjoy the journey!
- Let go of perfectionism. If you’re trying to reproduce something exactly, you’re most likely going to be disappointed. Allow yourself to play with the materials, experiment. Be kind to yourself. Offer yourself the generosity you’d give to your child, “Honey, I love that! (even when you have no idea what the heck that is).
- Have fun! Of course you know that’s my mantra. If crafting in this way isn’t fun for you, don’t bother. The idea is to enjoy the experimentation and see where it leads. If you’re not used to working this way, tension can stand in the way of your enjoyment. Go ahead and follow directions if it makes you feel better. Far be it from me to tell you how to work!
You may not love or even like what I turned out, but maybe it will inspire you to give it a try to crafting by the seat of your pants.
Here’s what I collected:
What caught my eye first were the colorful lids. When stacked, I saw a “flower.” I looked for a dowel for the stem but couldn’t find one so instead, I used a yard stick. (When you’re going in a particular direction and don’t have on hand what you need, instead of rushing to the store or giving up ask yourself what you can substitute. Maybe you’ll need to take the project in a different direction, but that’s OK too.)
I punched a hole in the center of each lid, then stuck a wire through all four, added a bead, wove the wire to the back and twisted it around the stick. The leaves and hearts are cut from plastic lids and stapled on.
Next up, the playing cards. Painted and stamped them. Wired on wood stamped letters. Curled the wire. Covered the front of four clothespins with paper. Lined up “love.” You could also hang them by the clothespins from a piece of ribbon or string and on the back of each add a short poem or words of love as I’m going to do for my love. (That part is private!)
From the flower pot I made a container for a package of seeds collected from my garden. The best part of this was that I used a truly “useless” part for the upper body (the white part). This is what remained of a shower filter holder after I’d sent the the filter back for recycling. I found it fit perfectly inside the flower pot and the threads where it screwed into the shower created the “neck.” (This is what I mean about allowing yourself the freedom to experiment. Once you do, you’ll find yourself looking at castoff objects in a totally new way.)
Next I glued on a wooden ball (which I’d evidently tried using before because it had a face drawn on it that I didn’t like. I covered that face with “hair,” turned the ball around and drew on the new face on the other side). A beaded bracelet is the necklace.
Finally, I punched out and glued on some paper flowers. The seed packet fits inside the figure making a fun gift. The “box” can be kept or the seeds can be planted in the flower pot.
Out of the clear plastic box, I made a “shaker,” by filling it with the letters that spell out “I love you.”
But will be up to the recipient to shake them into place or, if she runs out of patience (this will go to one of my granddaughters), just open the box and arrange the letters.
All I did was to cut a circle of paper to fit in the bottom and glued on a decorative charm on top and four wooden balls for feet.
Even though this last item is not made from the stuff I collected in the first picture, I thought I’d include it since the idea came to me as I was looking for pink papers to use in the box above. It’s a bit hard to see in this picture, but it’s a Valentine spinner. It consists of a few dozen strips of paper sewn down the middle starting with two hearts. Once sewn, the hearts pull apart so they are three dimensional and the strips will twist in the wind.
Made any fun Valentines out of leftover stuff?
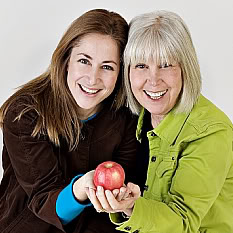
Lynn Colwell and Corey Colwell-Lipson are mother and daughter and authors of Celebrate Green! Creating Eco-Savvy Holidays, Celebrations and Traditions for the Whole Family, and founders of Green Halloween®.